

DYNAMIC WARMUP
1. Standing Hamstring Scoop
- Stand with your right foot forward and to the right, so that your right heel is about 6 inches in front of the toes on your left foot and 6-12 inches to the right of your left foot.
- Lift your right foot so that it is on the heel.
- In one motion, bend at the hip so your body folds forward towards the ground (keep the back and spine straight in one line). Keep both arms straight the whole time, stretch both arms directly down towards the ground, and make a semi-circle with your arms toward your body, as if you were scooping something off your the floor.
- Perform the movement repeatedly 10-15 times.
- Switch legs and perform the movement 10-15 more times, for a total of 20-30 repetitions.

2. Aquaman
- Lie face down on the ground, toes pointed, ankles touching the ground. Extend your arms forward like Superman in flight, palms down, touching the ground.
- Pull one arm and the opposite leg off the ground by engaging your glutes, shoulders, core, and back. They should raise up 2-3 inches.
- Ensure that your arms are also fully contracted.
- Hold this position for 1-2 seconds.
- Slowly lower your arm and leg back to the starting position. Repeat, using the other arm and opposite leg.
- Perform 10-15 repetitions on each side for a total of 20-30 repetitions.

3. Towel Snatch
- Grab a towel, t-shirt, band, or any sturdy, lightly stretchable object you can pull between your hands. Hold the ends of it and let your hands naturally drop down below your waist as if you were simply holding it.
- Bend your knees slightly to get into a high squat position.
- Hold the object taut, as if you’re attempting to rip it in half (make sure you’ve chosen a fabric that can withstand this).
- As you pull it, keep your hands and arms straight and do not move your elbows. Move your hands up from your body, all the way over your head, and then bring them back towards your waist, ensuring that you are pulling the object the entire time.
- Perform the movement 15-20 times.

UPPER BODY STRETCHES
1. Child's Pose
Starting position: Get into a tabletop position, with your hands directly under your shoulders and your knees in line with your hips.
- Push your butt back towards your feet as far as possible.
- Stretch your arms out on the floor in front of you until you feel like your spine is elongating.
- Reach forward with your fingers to further elongate the spine, to the extent that it feels good and comfortable.
- Hold the stretch for 60 seconds and deepen the stretch when you feel it is possible by further elongating your spine.

2. Up & Down Neck Tilt
Starting position: This can be done while
you're seated or standing.
- Start with your head squarely over your shoulders and your back straight.
- Lower your chin toward your chest, hold for 3-5 seconds. Relax, and slowly lift your head back up.
- Tilt your chin up toward the ceiling and bring the base of your skull toward your back. Hold, and then alternate.
- Repeat both motions in succession, alternating every few seconds.

3. Levator Scap Neck Stretch
Starting position: Stand with your feet hip-width apart and arms down by your sides, or sit in a chair with your back straight.
- Put your right hand on the back of your head with your fingertips reaching the base of your skull. Fingertips should be facing down your spine.
- Bring your chin to your chest and turn the back of your head towards your right armpit.
- Hold the stretch for 15 seconds, and then relax.
- Repeat the same stretch on the left side for 15 seconds.

4. Cross Arm Shoulder Stretch
Starting position: Stand comfortably, with your feet shoulder-width apart, and hold your arms
out horizontally.
- Cross your left arm across your chest, so that your left fingers are pointing towards the right side of your body.
- Support your left arm with the elbow crease of your right arm, or use your right hand to hold your left arm in place against your chest.
- Use your right arm to pull your left arm in towards your body, so that you feel a stretch in your left shoulder.
- Hold for 15 seconds.
- Relax, and then perform the same stretch on the right shoulder.

5. Locust Pose
Starting position: Lie flat with your face and belly towards the ground and your arms lying comfortably beside your body.
- Lift your chest, arms and your legs as much as possible to form a sort of boat shape, curving the inner part of your back towards the ground and the outer parts of your body and spine towards the ceiling.
- Hold for 30 seconds.

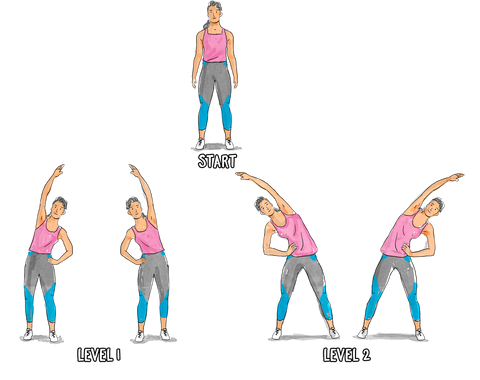
6. Standing Oblique Stretch
Starting position: Stand with your feet slightly wider than hip-width apart, and with a slight bend in the knees.
- Place your right hand on your hip, and raise your left arm straight up above your body.
- Lean your torso towards the right, bending at the right side of the waist. Keep the knee on the leg you’re leaning towards slightly bent.
- Try not to actually move your hips, but simply bend towards the right until you feel a stretch in your left obliques (the muscles on the left side of your abdomen).
- Hold for 15 seconds.
- Relax, and then repeat the same stretch on the other side.
7. Behind the Back Tricep Extension
Starting position: Stand comfortably, with your feet shoulder-width apart.
- Lift your right arm straight up above your body and then bend at the elbow to lower your right hand behind your back, bringing your palm down as far down your back as you can.
- Grab your right elbow with your left hand and gently pull it to the left until you feel a comfortable stretch.
- Hold for 15 seconds.
- Relax, and then perform the same stretch on the left tricep.

LOWER BODY STRETCHES
1. Frog Pose
Starting position: Lie facedown, bend your
knees about 90 degrees, and spread them
as wide as you can.
- Fold your hands under your forehead to relax the upper half of the body.
- Keeping your knees bent, sink your hips towards the floor.
- Hold for 60 seconds, and deepen the stretch by sinking your hips more towards the floor whenever possible.

2. Butterfly
Starting position: Sit on the ground and place
the soles of your feet together in front of you.
Let your knees bend out and fall to the ground
as much as gravity allows them to.
- Place your hands on your feet and pull your heels towards you.
- Keep your back straight and your abs engaged as you let your knees relax and inch closer to the floor. You’ll feel the stretch in your groin muscles.
- Hold for 30 seconds, deepening the stretch whenever it feels comfortable to do so.

3. Seated Spinal Twist
Starting position: Sit on the floor with one leg extended straight out in front of you, the other leg bent comfortably so that the sole of your resting foot touches the inner thigh of the straight leg, and your back straight.
- Bend forward at the waist, making sure to keep the back straight, and reach out towards your foot with your hands as far as you can.
- Hold for 30 seconds, deepening the stretch whenever it feels comfortable to do so.
- Relax and perform the same stretch on the other leg.

4. Runner's Lunge
Starting position: Get into a push-up position with your hands and the balls of your feet on the floor, both shoulder-width apart, and a straight line running through your head down to your feet.
- Step your right foot to a point just outside your right hand. You should feel a stretch in your hip and groin area on the left side.
- If you feel comfortable and want a deeper stretch you can stretch more, lower your elbows closer to the floor instead of using your hands for stability.
- Hold for 30 seconds.
- Return to the starting position, and repeat with the left leg forward.

5. Pigeon Stretch
Starting position: Start by getting into a tabletop position on your hands and knees.
- Bring your right knee forward and place it behind your wrist while shifting the leg so that your right ankle is in front of your left hip or left elbow.
- Straighten your left leg behind you, making sure your left knee is straight and your toes are pointed out behind you.
- Keeping your hips square, lower your torso towards the ground until you feel the maximum possible stretch that feels comfortable for you.
- Hold the position for 30 seconds.
- Repeat the same stretch on the left leg.

6. Pry Squat
Starting position: Stand with feet about 1.5 shoulder-distance apart with your feet comfortably pointed outwards away from your body.
- Sit into a squat and place your elbows on the inside of your knees. Feet should be pointed outwards away from your body. If you can’t do this, get into a comfortable squat, and lean your hands on your elbows for support.
- While trying to make sure both feet are completely flat on the ground, deepen the squat as much as you can by lowering closer to the floor.
- Use your arms to press your knees as far out as is comfortable while still maintaining a tight core and proper squat form with your spine as straight as possible, without arching your spine.
- Hold for 30 seconds and deepen the stretch whenever possible.

7. Downward Dog
Starting position: Begin on all fours, with your knees hip-width apart and your hands directly below your shoulders.
- Press back into your heels to straighten your knees and raise your butt up to the ceiling until you feel the stretch in your hamstrings. If you need to, extend your arms forward so that you can straighten your legs a bit more.
- Keep your head, neck, and spine aligned as you press back into the feeling of the stretch in the back of your legs and calves.
- Hold for 30 seconds, deepening the stretch whenever it feels comfortable to do so.
